Crochet techniques: How to read a stitch diagram
Stitch diagrams can be one of the easiest ways to help you envisage how the stitches are supposed to work together when you don’t have a close up of the pattern itself.
They are made using symbols to signify the stitches. A full list of which can be found in the appendix, but here are the ones you will find in most beginner patterns:
| Symbol | Stitch |
 |
Chain |
 |
Slip Stitch |
 |
Double Crochet |
 |
Treble Crochet |
 |
Half-Treble Crochet |
 |
Magic Ring |
 |
Increase |
 |
Decrease |
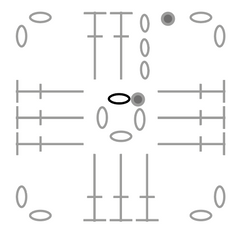
An example stitch symbol pattern, for the following pattern:
Ch 4, join with a sl st into the first ch,
ch 3, 2 tr, (2 ch, 3 tr) 3 times, ch 2
and join with a sl st.
Start at the highlighted stitch and work anti-clockwise around the diagram.