Need to Know
Yarn
Hooks & Notions
Measurements
Abbreviations
Size Chart
|
|
UK |
US |
EU |
Length |
square width |
|
|
Baby |
Baby |
Baby |
6-10cm |
4cm |
|
Child |
2-5 |
5-8 |
20-23 |
11-13cm |
6cm |
|
6-9 |
9-12 |
24-27 |
|
7cm |
|
|
10-13 |
13-2 |
28-32 |
|
8cm |
|
|
Adult |
1-4 |
3-6 |
33-37 |
|
9cm |
|
5-8 |
7-10 |
38-40 |
|
10cm |
|
|
9-11 |
11-13 |
41-44 |
|
11cm |
Taking Measurements
Measure your foot from the heel to the tip of your big toe, and the width across the ball of your foot. Using these sizes, look at the chart above to figure out your granny square size.

Need some help or spotted an error?
Contact me at jen@crochetbouquet.co.uk or over on Instagram @crochetbouquetbyjen and I’ll be happy to help.

Pattern Begin
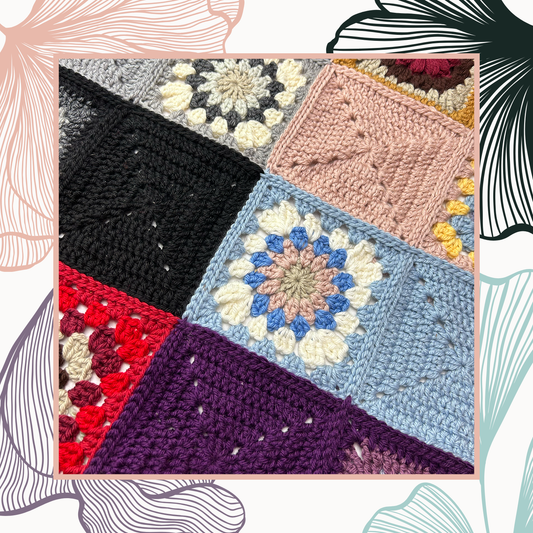
Granny Squares
Colour Combinations:
See the table, below, for my colour combinations, I did 2 squares of each, and 2 in only one colour for the soles.
Using your first colour, ch 4, and join with a sl st.
Rnd 1: Ch 3, 2 tr, *2 ch, 3 tr, rep from * 3 times, ch 2 and join with a sl st into top of ch 3. Break yarn and tie off.
Rnd 2: Join your second colour into the corner-sp. (Ch 3, 2 tr, ch 3, 3 tr) into the same space. Then (3 tr, 2 ch, 3 tr) into each corner space, with no ch between the 3 tr. Join to top of st, break yarn and fasten off.
Rnd 3: Join your second colour into the corner-sp. (Ch 3, 2 tr, ch 3, 3 tr) into the same space. *3 tr into the edge space(s), then (3 tr, 2 ch, 3 tr) into the following corner-sp. Repeat from * to end. Join to top of st, break yarn and fasten off.
Repeat row 3 until you have reached your desire size. In the photographed example I have used 6 rounds to achieve my correct size.
Now onto the assembly, which is a bit baffling, but don’t worry. I’ve tried to make it as clear as possible below.
|
Rnd |
1 |
2 |
3 |
4 |
5 |
6 |
|
Tops |
B |
D |
C |
A |
D |
C |
|
sides |
D |
A |
B |
C |
A |
B |
Assembly

Use colour D to attach your squares using a dc in each st, and one in each space between the 3-tr clusters.
Step 1: Place your first sole square WS together with a top square.
Front |
Back |
 |
 |
Note: You will always have the RSs facing you while attaching.
Starting on a corner with the sole square facing you, insert your hook and join the two sides using a dc.
When you reach the next corner do 2 dc, 1 ch, 2 dc in the ch-sp.
Connect the second side.
Step 2: Take a side square and attach to the third side, with the sole still facing you.
Front |
Back |
 |
 |
Step 3: Take your second sole square, and attach to the side square second side, with the sole side facing you.
Step 4: Now take your second top square and attach along the second edge of the sole square, and along the second edge of the top.
Step 5: Taking the final side, and attach to the fourth side of the second sole, a sl st into the other junction of the side and sole square, then attach the second side of the side square to the final side of the first sole square.
Step 6: Flip your slipper over, fold the side pieces in half to the RSs are together, and now attach the side to the top edge, and finally attach the remaining top to the remaining side.
Note: You will have a ‘flap’ where the second top is only attached on two sides, this is your foothole!
Finishing
Attach your chosen colour to any st.
Rnd 1: Ch 1, dc in each st and sp around the opening.
Make a pom pom and fasten on.

Show Your Support
By purchasing the pattern PDF, you will be supporting my ability to provide even more free patterns and tutorials.


Buy me a 'Coffee'

You Might Also Like
-
Taylor Swift The Eras Tour - Colour Chart Pattern - PDF Only
Regular price From £5.00Regular priceUnit price per -
The Eras CAL
Regular price From £5.00Regular priceUnit price per -
Taylor Swift The Eras Tour (TTPD Version) - Colour Chart Pattern - PDF Only
Regular price From £5.00Regular priceUnit price per -
Taylor Your Own Dress - Crochet Pattern - PDF Only
Regular price From £5.00Regular priceUnit price per